¶ HAVox32
HAVox32 is a Home Assistance Vox device that outputs any preloaded MP3 or WAV files on the device. It is designed for notifications and home entertainment with home automation. The device does NOT require internet access. Which is one of the main drawbacks of using something like an Amazon Echo, or Google Home device for the same use case. It is built upon the ESPHome framework.
For simple notifications the device can alert you with a sound or music using Automations in home assistant. For entertainment, you can play any MP3 files or use it in combination with Automations. One example would be to use a WAV file and pre-loaded sounds that might tell a child a story at bedtime, or remind them to wake up, time to clean up, etc. The device does NOT require internet access. Which is one of the main drawbacks of using something like an Amazon Echo, or Google Home device for the same use case.
The base and electronics enclosure can be covered by almost any 3D Print. You can make this a simple audio device, or get creative with tops such as a unicorn or animated character 3D printed. To create your own tops you simply need to place a 112mm hole, 75mm deep into any 3D model with Tinkercad. The model files also include a blank template if you prefer to build onto that. The base should easily support most prints and the sound comes from the bottom of the device. You can change these up whenever you like or perhaps seasonally to match room decor.
The video covers setup and installation of the device:
Coming Soon.
¶ Bill of Materials and optional components
ESP32 & Breakout board - https://amzn.to/3OjU3h1
DFRobot DFPlayer Module - https://amzn.to/43z2wRQ
8ohm 3W Speaker MAX - https://amzn.to/3Whhr0H
M3 8mm Screws - https://amzn.to/3IHN5iD (Get the big box! Trust me you’ll use them over time)
Tiny Zip Ties - https://amzn.to/41MjlaE
Dupont Jumper Wires - https://amzn.to/3MwRWVX (You will need to cut two for soldering to the speaker)
Hot Glue / Rubber Cement to attach speaker.
Optional for LED notifications
Addressable LED’s - https://amzn.to/3pO8P5H
¶ 3D Models
As allways the models are available on several repositories including Thangs.com
Most models can print without supports. Exception being the top if you use MM-A1 or DIY your on top.
¶ Assembly
The entire project has limited soldering.
¶ Step 1: Solder Speaker
Cut two of the dupont jumper wires and solder them to the speaker. Pay attention to note the +/- on the speaker and solder the appropriate jumpers to the speaker. You only need around 80mm of length on the wire.
¶ Step 2: Connect DFRobot DFPlayer Module and Speaker
DFPlayer Pinout Reference (Datasheet)

Note that the ESP32 Breakout Board used in this project has 5V, 3.3V and GND pins available for your use and labeled on the board. Use those for the Open 5V and GND pins.
Using the Jumper Wires connect the following.
| ESP32 Breakout Board Pins | DFRobot DFPlayer Pins | Speaker |
|---|---|---|
| Open 5V Pin | VCC | |
| Open GND Pin | GND | |
| GPIO16 (RX) | TX | |
| GPIO17 (TX) | RX | |
| SPK_2 | Speaker - | |
| SPK_1 | Speaker + |
Once you have everything connected, inser the parts into their respective slots in the electronics base. Once the player and breakout board are in place. Use zip ties to lock them in place. Then use some hot glue or other adhesive to keep the speaker in place. Don’t overkill attaching the speaker, its designed to sit on a desk so only enough glue to keep it in place is required.
¶ Step 3: Load Firmware & Insert ESP32 into Board
Add the following code to your ESPHome device that you provisioned for this project. Unsure how to provision a device for ESPHome? This will follow the same process to adopt a device as I covered in my DIY Soil Sensor video. You simply need to adopt the device and use th code below.
Base Code (Adding a LED Light Segment covered after this)
This sets up the DFPlayer for use. No modifications are required.
uart:
  tx_pin: GPIO17
  rx_pin: GPIO16
  baud_rate: 9600

dfplayer:
  on_finished_playback:
    then:
      logger.log: 'Playback finished event'

api:
  encryption:
    key: "<YOUR KEY IF USING API FALLBACK>"
  services:
  - service: dfplayer_next
    then:
      - dfplayer.play_next:
  - service: dfplayer_previous
    then:
      - dfplayer.play_previous:
  - service: dfplayer_play
    variables:
      file: int
    then:
      - dfplayer.play: !lambda 'return file;'
  - service: dfplayer_play_loop
    variables:
      file: int
      loop_: bool
    then:
      - dfplayer.play:
          file: !lambda 'return file;'
          loop: !lambda 'return loop_;'
  - service: dfplayer_play_folder
    variables:
      folder: int
      file: int
    then:
      - dfplayer.play_folder:
          folder: !lambda 'return folder;'
          file: !lambda 'return file;'

  - service: dfplayer_play_loop_folder
    variables:
      folder: int
    then:
      - dfplayer.play_folder:
          folder: !lambda 'return folder;'
          loop: true

  - service: dfplayer_set_device_tf
    then:
      - dfplayer.set_device: TF_CARD

  - service: dfplayer_set_device_usb
    then:
      - dfplayer.set_device: USB

  - service: dfplayer_set_volume
    variables:
      volume: int
    then:
      - dfplayer.set_volume: !lambda 'return volume;'
  - service: dfplayer_set_eq
    variables:
      preset: int
    then:
      - dfplayer.set_eq: !lambda 'return static_cast<dfplayer::EqPreset>(preset);'

  - service: dfplayer_sleep
    then:
      - dfplayer.sleep

  - service: dfplayer_reset
    then:
      - dfplayer.reset

  - service: dfplayer_start
    then:
      - dfplayer.start

  - service: dfplayer_pause
    then:
      - dfplayer.pause

  - service: dfplayer_stop
    then:
      - dfplayer.stop

  - service: dfplayer_random
    then:
      - dfplayer.random

  - service: dfplayer_volume_up
    then:
      - dfplayer.volume_up

  - service: dfplayer_volume_down
    then:
      - dfplayer.volume_down
The following optional code is if you want an LED Strip. I used GPIO23, but you’re free to use any PWM pin available on the board for LED’s. I suggest adding this code before the uart: in your YAML for readability. Modify this for your particular needs and top. Its completely optional to add this piece but its nice as a visual indicator should you miss an announcement.
light:
  - platform: fastled_clockless
    chipset: WS2812B
    pin: GPIO23
    num_leds: 7
    rgb_order: GRB
    name: "LED Strip"
    id: led_strip_light
    default_transition_length: 0s
    color_correct: [50%, 50%, 50%]
    restore_mode: RESTORE_AND_OFF
Once you have updated the code. Install the code OTA (Wirelessly) to the board from ESPHome inside Home Assistant.
Finally, insert the programmed ESP32 into the board and you’re ready to assemble the base. Make sure you plugged in the ESP32 so the USB Ports are all on the same side. Otherwise you will have plugged it in backwards and you can expect to see something like this happen.
¶ Step 4: Assemble Base
Use 2 M3 Screws to attach the base onto the bottom of the electronics enclosure. Align the holes properly before screwing them in but if I need to tell you that you probably shouldn’t be attempting this project. 
¶ Step 5: Copy Files to SD Card
Copy your files to the SD Card. The card naming convention uses the dir/file convention. This actually helps with organizing types of sound files for any notifications.
Example File system:
01\001.MP3
01\002.WAV
02\001.WAV
03\001.MP3
You can see that you can have multiple directories, and then up to 999 files underneath. WAV and MP3 can be used.
These directories and files exist off the root of the filesystem on the SD Card.
¶ Step 6: Add Device to Home Assistant
Once you have the device setup and in Home Assistant it is likely that a notification will appear stating that new devices have been detected. Add the device to Home Assistant and give it a proper name and location in your environment.
¶ Step 7: Setup Automations
I wont go over setting up the automations but rather show you what is necessary to call the device. The same service calls can then be used in your automation. The testing of the service call will confirm the device is working properly. The LED strip should show as its own light entity as soon as you adopt it.
Inside home assistant you’ll need to go to developer tools. Then you can call the DF Player service. This is called with a folder (the folder number used above) along with the file number. We used 4 and 12 in this example which would be a file named 04\012.MP3.
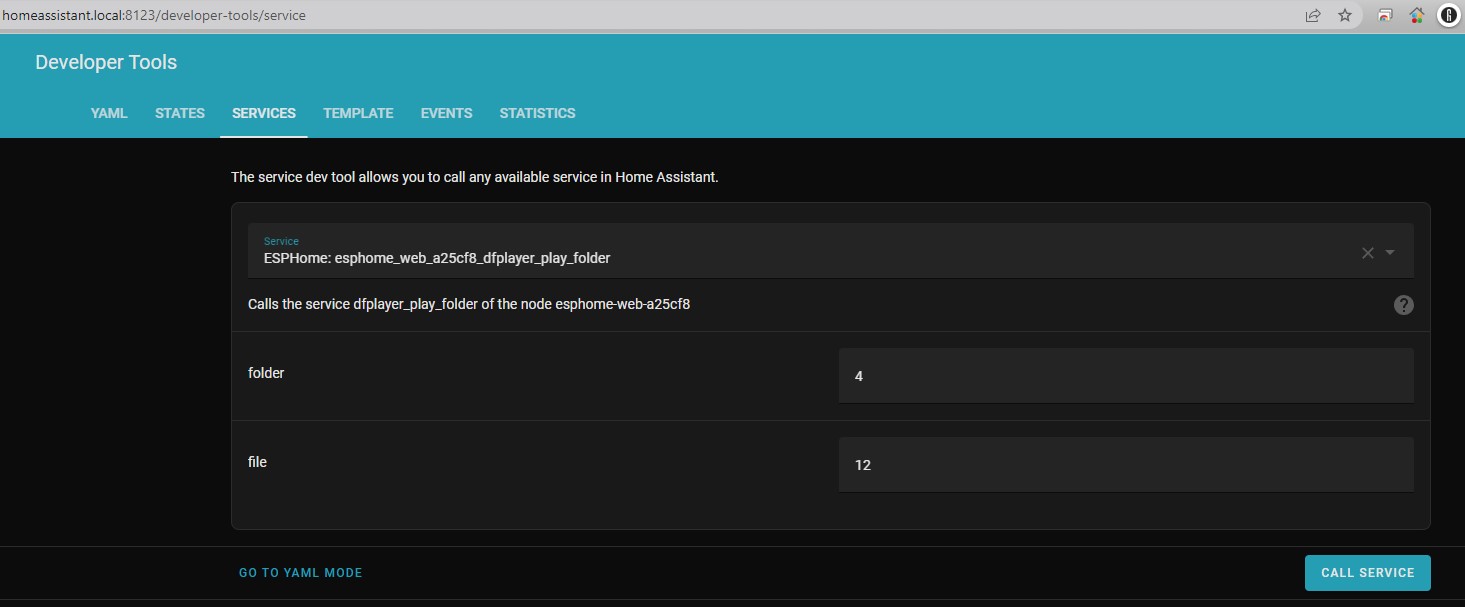
If everything is wired correctly you should hear the MP3 file play. If you used a different file name and number (which you likely did) update the folder and file appropriately.